Terese is a tool which can be used to facilitate proofing the outcome of OCR programs, such as Tesseract. The basic idea is to try to map the OCR text to the original image. Differences, i.e. errors in the OCR text, are then easily identifiable. Note that it will not do the proofreading for you; rather, it is a tool which will help you verify that your proofread text corresponds to the original.
To use Terese for your proofing work, you will first have to generate a font for your particular text; that is, train Terese, by letting it calculate an average picture for each of the characters in the text you want to proofread. This process is potentially somewhat time consuming, and for that reason, Terese is specifically suited for longer works (books) set in a single font. If you only want to proof a page or two, it is probably not worth the effort.
To easier let you test the functionality of Terese, I ship it with an example of a generated font, and some pages that you can practice proofreading. See the section Using Terese for more information.
(Note that Terese is developed under Linux. For the convenience of Windows users I also offer a Windows version, which, however, has not been as extensively tested as the Linux version. If you have the possibility, I recommend that you run Terese under Linux instead: there are many excellent Linux distribution which you can run directly from a CD or a USB flash drive, without having to install anything on your computer.)
Download the latest Win32 release from the project's files page, unzip it, and move terese.exe to the folder where your scans and their corresponding OCR text are located. Note that Terese will write its configuration file, terese.ini, in the directory from which it was started.
To run it, you will have to install gtkmm for Windows. The current release is built with version 2.16. (It might work even if you have another version installed; I have not tested it.) When it comes to select the type of install, select "Runtime only" to save some hard drive space. Once installed, you might have to restart your computer.
To run the accompanying scripts, you need Python 2.6.
Terese is initially set to use the DPCustomMono2 font (included in the zip file). You should either install it (from the Control Panel, Fonts), or edit terese.ini where you can set the font to whatever you want.
I don't bother with a binary release for Linux; simply download the latest source release. On Ubuntu at least, the build procedure is as follows:
sudo apt-get install build-essential libgtkmm-2.4-dev
tar xf terese*.tar.bz2
cd terese*
./configure
make
sudo make install
Note that Terese will write its configuration file, terese.ini, to the directory from where it is started. This makes it easy to use Terese with different projects at the same time, since each project would have its own configuration file. You should use the terminal, navigate to the directory where your scans reside, and start Terese from there.
Terese is initially set to use the DPCustomMono2 font (also found in the src directory). You should either install it (for example to ~/.fonts/), or edit terese.ini where you can set the font to whatever you want.
(If you only want to test the functionality of Terese, you can skip to the section Using Terese, and test it with the provided example files.)
I will suppose that you have the work you want to proofread in the form of scanned image files, one image per column of text, at a resolution of, say, 300 to 600 DPI, monochrome tiff. (I haven't been able to get Tesseract to understand grayscale images.) Move the compiled terese to the directory where these tiff files reside.
The actual proofing can be done on text generated by any OCR program, but to train Terese, you have to use Tesseract. In this tutorial, I will use Tesseract 2.04.
Try to find a small number of pages where all the characters in the font are represented; you will probably have to choose several pages, to match all the characters used in the book. (This is not critical; you can always go back and add another page, if it has a new character.) If you have gone through the text already, and done some preliminary proofreading so that the text files are reasonably correct, you can use the script pagepickout.py to find a good set of files.
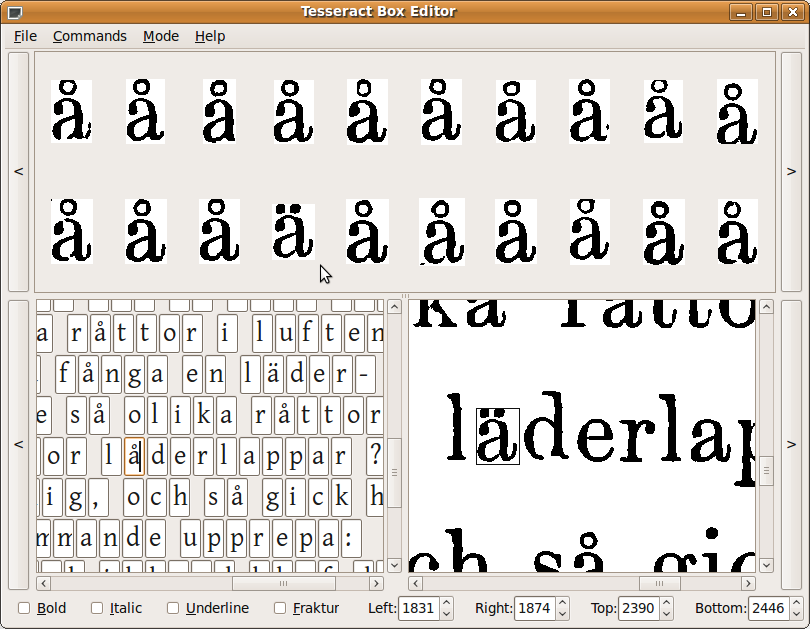
Generate box-files for the pages you have chosen, like this: tesseract scan.tif scan batch makebox && mv scan.txt scan.box. These box-files need to be carefully corrected; for this, you can use tesseractTrainer.py (see illustrating screenshot).
A drawback with the box file format is that it doesn't save information about spaces. I have solved this with a separate plain text file, which has the same text as represented in the box file, but with spaces in the correct places. If a box file is named scan.box, Terese expects this corresponding text file to have the name scan.box.txt. To generate such text files from your proofread box files, copy the script box2txt.py to the folder where your box files reside, and run it: python box2txt.py 10 *.box. (Note that this will overwrite all the *.box.txt files in this folder!) Adjust the number 10 so that the word spaces in these text files correspond to the spaces in the original. You can (should) edit them manually, and add and remove spaces where needed.
Then start Terese (from the terminal, because it will output information to stdout), click Create Font in the Proofing menu, and select all your corrected box files. The creation of the font will likely take a while. The font consists of three files: .png, .box, and .mtr. You should inspect the boxes with tesseractTrainer.py. If they contain unnecessary gray residues from surrounding characters, you should crop them:
When using Terese (see below), you can export to a box file (and corresponding .box.txt file). These exported files can then be used to re-generate the font, to get a potentially better result. This is also a convenient way to add new characters to a font. Suppose that your font does not include "ï": in that case, Terese will stall when it comes across it in a text. Temporarilly change it to a similar character, such as "i", and export to a box file. Then edit the box file and box.txt file, and change that "i" back to "ï". You should also adjust the boundaries of its box. Finally generate the font again, incorporating this new box file.
You are now ready to start proofreading! The text can come from any OCR program, or you can even type it by hand, it doesn't matter. But if you are reading this, you will in all likelihood want to use Tesseract, and since you have already created corrected box files, you better use them to train Tesseract as well, to improve your results! See the script train.sh in the examples folder; for the full story, refer to Tesseract's web page.
Tesseract itself does not have the ability to mark up the text it outputs. Italics, bold text, small caps, etc., all are output as plain text. It is however possible to train it to regard for example italic characters as separate glyphs in the same font. One method to achieve this is to code a character in different styles as a ligature of a prefix and the character. For example, your text may make use of three different styles: regular upright, italic, and bold. Terese and its accompanying scripts are configured to use the prefixes "$" and "@" for italics and bold, respectively. That is, when you make your box file, you should encode an italic "a" as "$a", a bold "b" as "@b", and so on. (If you are using tesseractTrainer.py, this is done automatically if you use the checkboxes.)
If you then train Tesseract with these box files, it will learn to interpret, say,
This is italics and this is bold.
as
$T$h$i$s $i$s $i$t$a$l$i$c$s and @t@h@i@s @i@s @b@o@l@d@.
Now, that is not very readable, of course, but you can convert it to HTML-tags, using the script txt2rtml.py. Running python txt2rtml.py scan.txt will output scan.rtml which will look like this:
<i>This is italics</i> and <b>this is bold.</b>
HTML you say? Why then is the file ending rtml? Well, when I developed Terese I used it to proofread works for Project Runeberg, and this is an effect of that. Here, RTML stands for Runeberg Text Markup Language, which is an extended subset of HTML. (Note: Not to be confused with RTML, Yahoo!'s programming language.) One important difference between RTML files and regular HTML is that a new paragraph is represented by two continous line breaks, rather than a <p> tag.
When you open, say, scan001.tif Terese will also try to open scan001.rtml. If it does not exist, it will instead try to open scan001.txt, and if that file does not exist, it will be created.
Whatever program you use, be it Tesseract or another OCR program, the output should be one plain text file per tiff file. If you made use of Tesseract and the trick noted above to get the markup of the text, you probably want to use txt2rtml.py to convert them to rtml files.
To recapitulate:
If all this seems daunting to you, with the proper compensation I may do step 2 to 10 for you. Contact me at johan.winge@telia.com for details.
So, you have copied your terese executable to the directory of your tiffs, and trained it, i.e. generated a font. (If not, you can open the font alice-font.mtr in the example folder.) Now go ahead and open the first tiff file. The corresponding rtml or txt file will be opened as well, provided that it exists:

Terese does not show the raw RTML code, but will parse the (R/H)TML tags instead. The text with blue background, for example, is really enclosed with <span> tags.
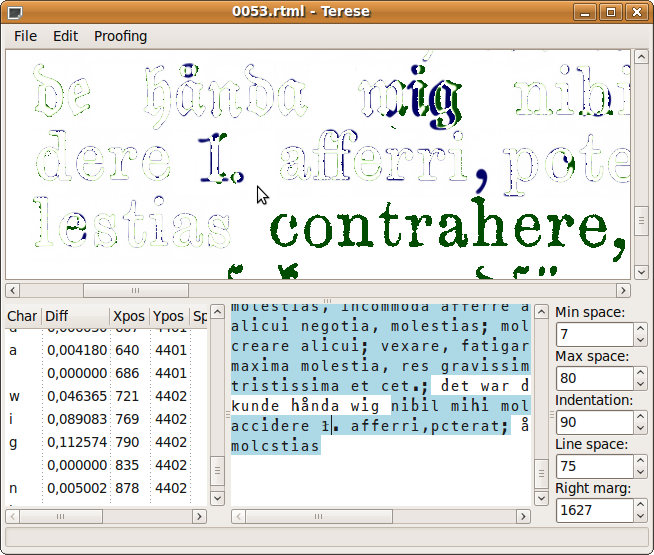
Now open the Proofing menu, and select Compare (or press F5) to tell Terese to perform its main task, i.e. to try to map the text to the image. It is a bit stupid, and might have troubles locating the start of the text:

As you see, the original text in the image is now shown in dark green, while the added text is dark blue. When the original ink of the scanned page and the letters that Terese adds overlap, it will be shown as white. Your objective is to wipe out all the text in this way. All the letters that have been placed out are listed in the lower left corner of the window. As you also see in the image, it failed to place the first letters correctly (and then gave up). Whenever such discrepancies are due to faults in Terese's mapping algorithm, rather than faults in your OCR-text, you can correct the placement of the mapped letters manually.
If you click on the first misaligned character (the left parenthesis in this case) it will be selected in the list. To move the selected character, hold down CTRL and double-click on its correct position:

Then press F5 again, to let Terese make another try. Here is an authentic example of Terese in action:

At least five errors in the OCR text can easily be located here: a hyphen for a period after "alqm", a lacking space after "tristis", another lacking space after "bitter,", lacking comma after "händelse", and a peculiar error where an "e" has been interpreted as "is". After this, Terese loses sync of the text, and soon gives up. (There is yet another error, which is really the fault of the original typesetter, and which is less easy to discern: to the left of the mouse pointer, an "r" that should have been set in Fraktur style is actually set in Antiqua. The sensible thing is of course to simply disregard such things.)
In the lower right corner, there are a couple of parameters. All units are in pixels:
Take your time tweaking these parameters to work optimally with your particular text. They are all saved in Terese's configuration file, so you don't have to re-set them every time you start Terese.
Terese provides optional hyphenation. If it is not activated (default), each line in the text file should correspond to a line in the scan, and if a word is broken over two lines, you will have to keep it that way in the text file for Terese to be able to map the text correctly. However, you generally want to remove such hyphens in your text, and to get Terese to handle this, you must activate hyphenation (in the Proofing menu). You should move the first part of each hyphenated word to the next line (and not the other way around.) For example, suppose that the text in your scan says:
This is a line with a hyphen-
ated word in it.
Then your text file should read
This is a line with a
hyphenated word in it.
For hyphenation to work properly, you must set the "Right marg" parameter. Each line break in the text file that occurs before Terese has reached the right margin, and which does not mark the end of a paragraph, will now be disregarded. After that, Terese will instead look for a hyphen in the image which is not represented in the rtml text, and then, but no sooner, will it move down to continue on the next line. To change this parameter, the easiest way is to hold down Shift, and click in the image, a bit to the left of the hyphen. (In the example, a good place may be between the "e" and the "n".)
Note: This feature more or less relies on a justified margin. If your text is jagged, it may be problematic.
It is always your responsibility to do the proofreading and judge the output of Terese. It will readily expose some kinds of OCR errors, but other errors may be difficult to see: for example, depending on the font and the quality of the scans, an error such as a "b" for a "h" may be impossible to find if you rely only on Terese. It can never replace manual proofreading. The best procedure is probably to read through the text once, continually comparing it to the original, and correct all errors you can find. Then let Terese do its comparision, to find the few remaining errors that you may have overlooked.
Good luck!